
Do not underestimate the power of social media! You can use Pinterest for art and sell your pieces!
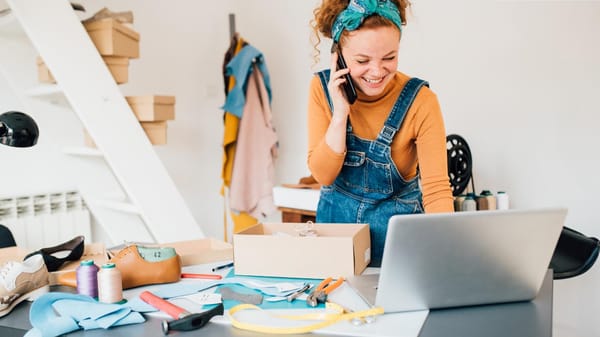
For a long time, I poured my heart into creating art—digital illustrations, watercolor prints, even a few mixed media pieces. But when it came to actually promoting or selling any of it, I felt lost.
Instagram felt oversaturated, and Etsy listings got buried under thousands of others.
I’d heard Pinterest was a powerful tool, but to me, it was just a place to pin recipes and home décor ideas. I was really a dummy for Pinterest! Until I decided to take it seriously. And once I did, things started to change.
Here’s how I learned to use Pinterest like a pro—and how it helped me promote and sell my art in ways I didn’t think were possible.
1. Switching to a Pinterest Business Account
At first, I was using a personal Pinterest account where I saved random ideas and inspiration boards.
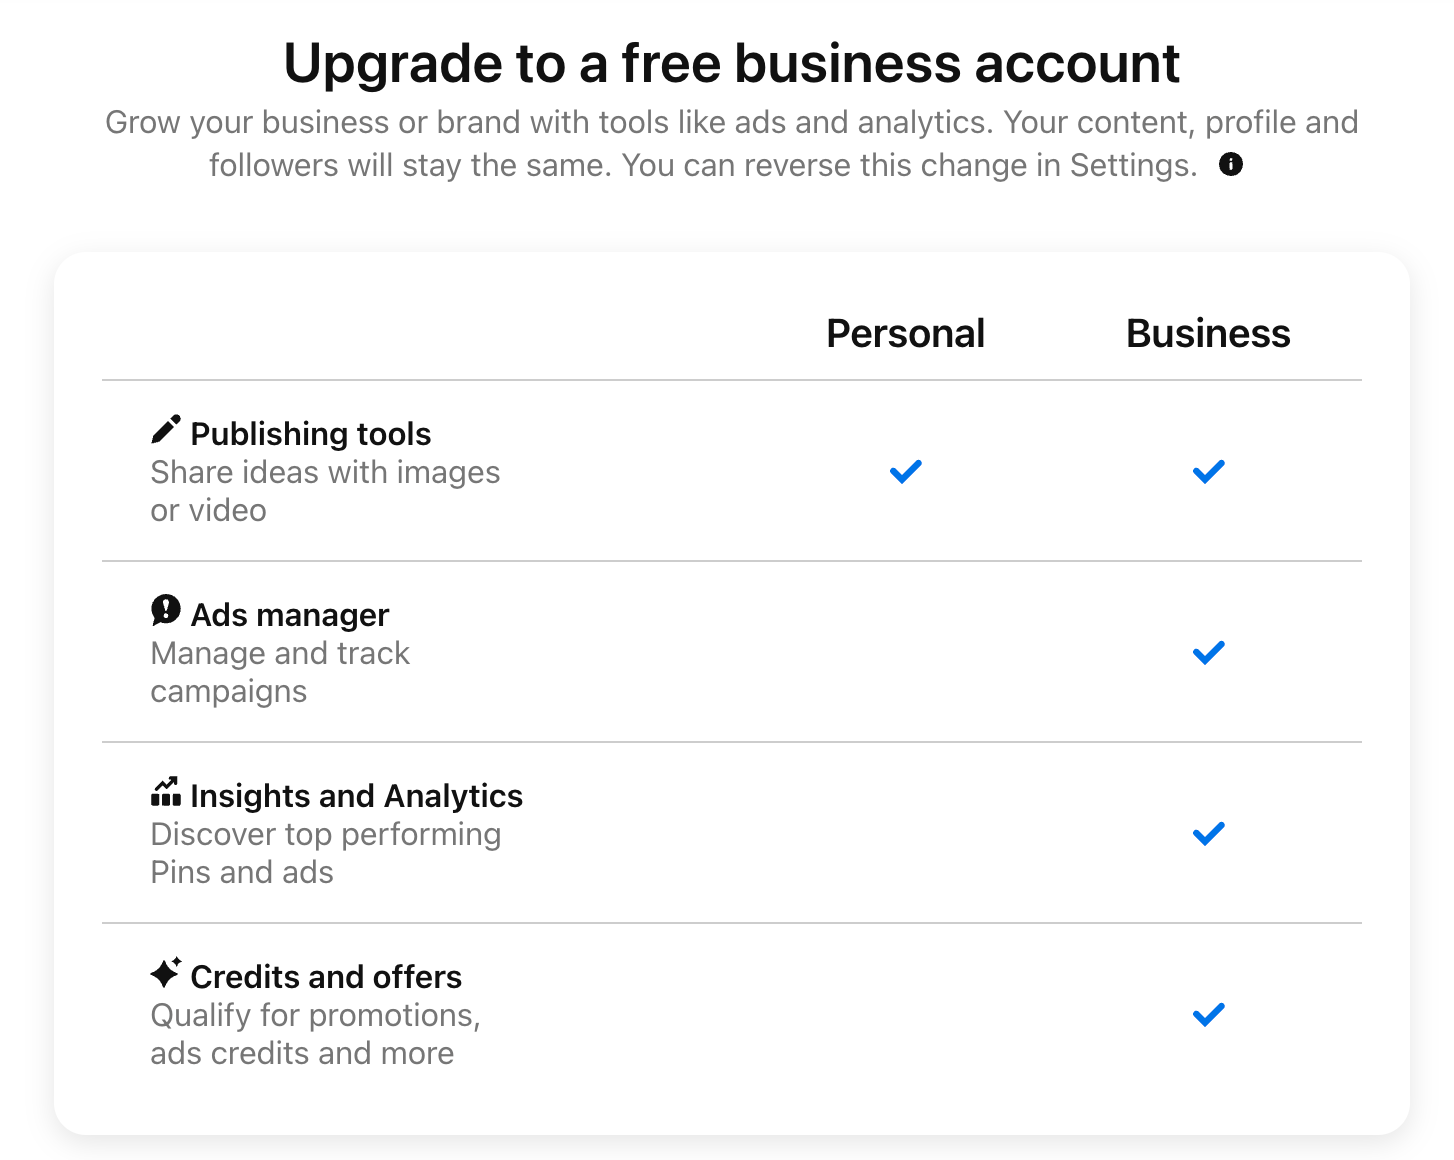
But then I discovered that Pinterest has Business Accounts with tools made specifically for creators like me—analytics, website linking, and something called “Rich Pins.”
Here’s how you can switch:
How to Set Up a Pinterest Business Account (Step-by-Step):
- Go to Pinterest for Business.
- Click “Join as a Business” or convert your existing personal account by:
- Clicking the drop-down arrow in the top-right corner.
- Selecting “Convert to Business.”
- Fill in your business name, website (or your Etsy shop), and category (choose Artist or Creator).
- Optimize your profile:
- Use a professional photo or your brand logo.
- Write a bio that includes keywords like “original watercolor art,” “digital illustrations,” etc.
- Add a direct link to your website or shop.
This was the first step that made Pinterest feel like more than just a casual platform—it felt like a place where I could actually grow.
2. Creating Boards That Make Sense
When I first got started, I dumped all of my artwork into one generic board titled “My Art.” It wasn’t clear, it wasn’t searchable, and it definitely wasn’t helping people find what they were looking for.
So I reorganized everything and started creating targeted boards based on:
➡️ Art style (e.g., “Watercolor Landscapes,” “Line Drawings”)
➡️ Room or use case (e.g., “Wall Art for Bedrooms,” “Printable Art for Offices”)
➡️ Customer intent (e.g., “Boho Digital Downloads,” “Affordable Gallery Wall Prints”)
These categories helped both visitors and Pinterest’s algorithm understand what each board—and each pin—was about.
How to Create a Board on Pinterest (Step-by-Step)
If you’re new to Pinterest, creating a board is simple. Here’s what I did:
1. Log in to your Pinterest Business account
2. Go to your Profile
3. Click the Saved tab
4. On the right side of the screen, click the plus (+) icon under “Saved”
5. Select Board
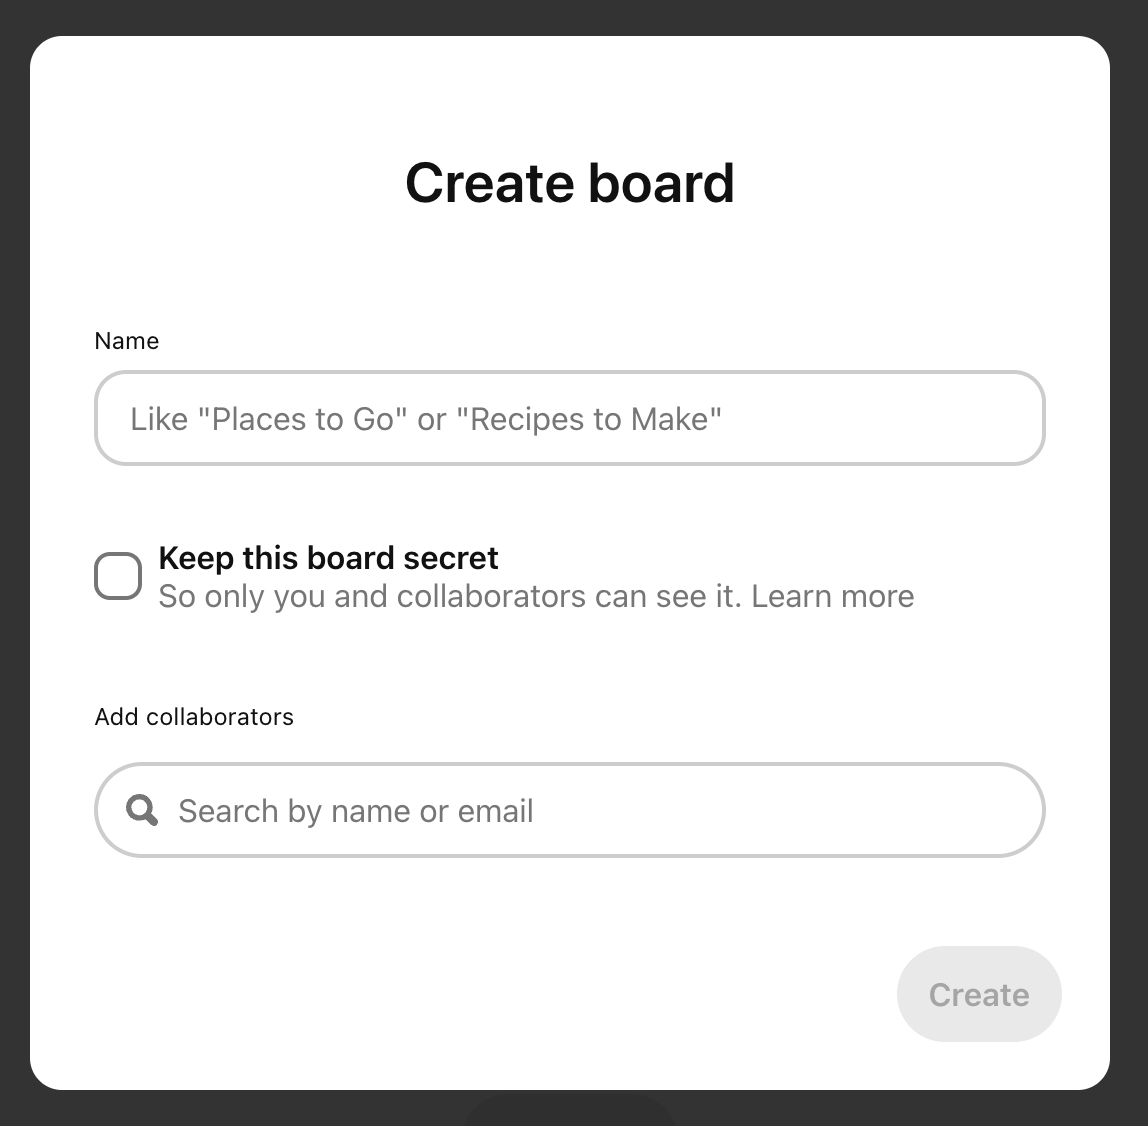
6. Enter a name for your board (something keyword-rich like “Abstract Art Prints”)
7. (Optional) Add collaborators or toggle the “Keep this board secret” option if you’re not ready to make it public
8. Click Create
9. Choose pins to add to your board, then click Done
After setting up the board, I also added a detailed description using relevant keywords so the board would show up in search results—for example:
“A collection of modern abstract art prints perfect for living rooms, bedrooms, and creative studio spaces. High-resolution digital downloads in neutral tones.”
That one small step—naming boards well and adding smart descriptions—immediately made my Pinterest profile look more curated and professional. Even better, people started finding my pins organically through board searches.
3. Designing Pins That Don’t Get Ignored
Early on, I just uploaded my artwork and hit “publish.” But nothing happened.
Then I realized Pinterest is a visual search—meaning your images need to both look good and tell people what they’re looking at.
What worked for me:
➡️ Using high-resolution images of my art (no blur, good lighting).
➡️ Adding text overlays using Canva:
- “Limited Edition Print”
- “New Collection: Abstract Botanicals”
➡️ Keeping the same fonts, colors, and style across pins for branding.
Pinterest even lets you create multiple pins for the same product, each with different angles, titles, or mockups.
4. Learning Pinterest SEO (The Game-Changer)
One of the biggest shifts in my Pinterest journey happened when I learned what Pinterest really is:
Pinterest SEO means optimizing your content (pins, boards, and profile) with keywords so it shows up when people search on Pinterest. Think of Pinterest as a visual search engine—not just a social media platform.
This was a lightbulb moment for me. I used to treat Pinterest like Instagram, posting random images with minimal descriptions. But on Pinterest, success comes from being discoverable—and that happens through good SEO.
Why Pinterest SEO Matters
❇️ Pins are evergreen—unlike Instagram posts that fade after a day, pins can keep bringing traffic for months or even years.
❇️ Pinterest users are actively searching for ideas, inspiration, and products. If your art matches what they’re looking for, you want to be in front of them.
❇️ Without keywords, your amazing pins might never be seen.
How I Found the Right Keywords (Step-by-Step)
Here’s how I started doing keyword research the easy way—right inside Pinterest:
- Use the Pinterest Search Bar
- I typed phrases like “watercolor art” or “minimalist prints.”
- Pinterest auto-suggested long-tail keywords like:
- “Watercolor wall art”
- “Minimalist art prints for bedroom”
- “Boho line drawing”
- Explore the Colored Tiles (on Desktop)
- After searching, Pinterest shows colorful tiles (like “modern,” “neutral,” “black and white”). These are highly searched modifiers—great for expanding your keywords.
- Spy on Similar Pins
- I clicked on popular pins in my niche and studied their:
- Titles
- Descriptions
- Hashtags
- If multiple top-performing pins used similar phrases, I took note.
- I clicked on popular pins in my niche and studied their:
- Made a Keyword Bank
- I created a Google Doc where I saved keyword variations for each theme (e.g., “neutral abstract art,” “scandinavian print,” “line art poster”).
- Then I used these in:
- Pin titles
- Descriptions
- Board names
- Image file names (before uploading)
Pinterest SEO felt like a secret language at first, but once I understood it, my pins started showing up in search results—and that’s when traffic started flowing to my shop.
If you’re trying to get serious with Pinterest, learning SEO isn’t optional—it’s essential.
5. Pinning Consistently (with Circleboom Publish)
After learning Pinterest SEO, I realized it wasn’t enough on its own—consistency mattered just as much. But manually posting every day was overwhelming.
So, I started using Circleboom Publish to manage my Pinterest account—and it made a huge difference.
It lets me:
🟢 Generate optimized pin descriptions with its AI tool (great for Pinterest SEO)
🟢 Design pins faster with Canva integration and image curation
🟢 Schedule pins at the best times to reach more people
Now I don’t worry about forgetting to post or wasting time writing captions.
How I Use Circleboom for Pinterest (Step-by-Step):
Step #1: Log in to Circleboom Publish and connect your Pinterest account.
You can easily register if you don't already have a Circleboom account.
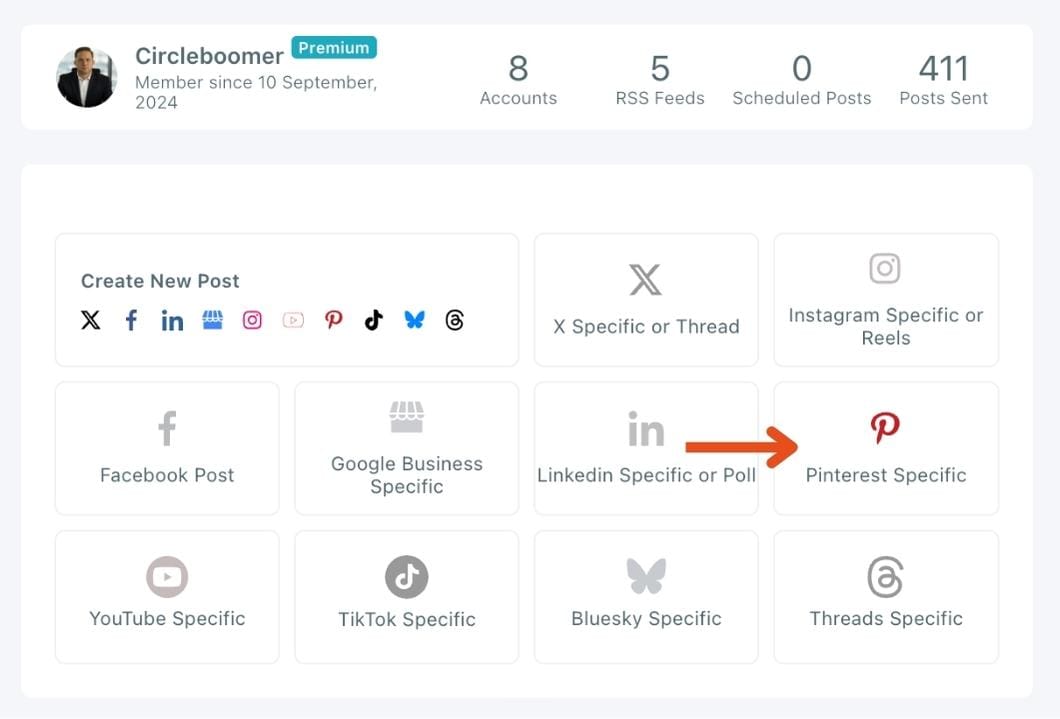
Step #2: Click on the “Create New Post” button.
You can also choose “Pinterest Specific”.
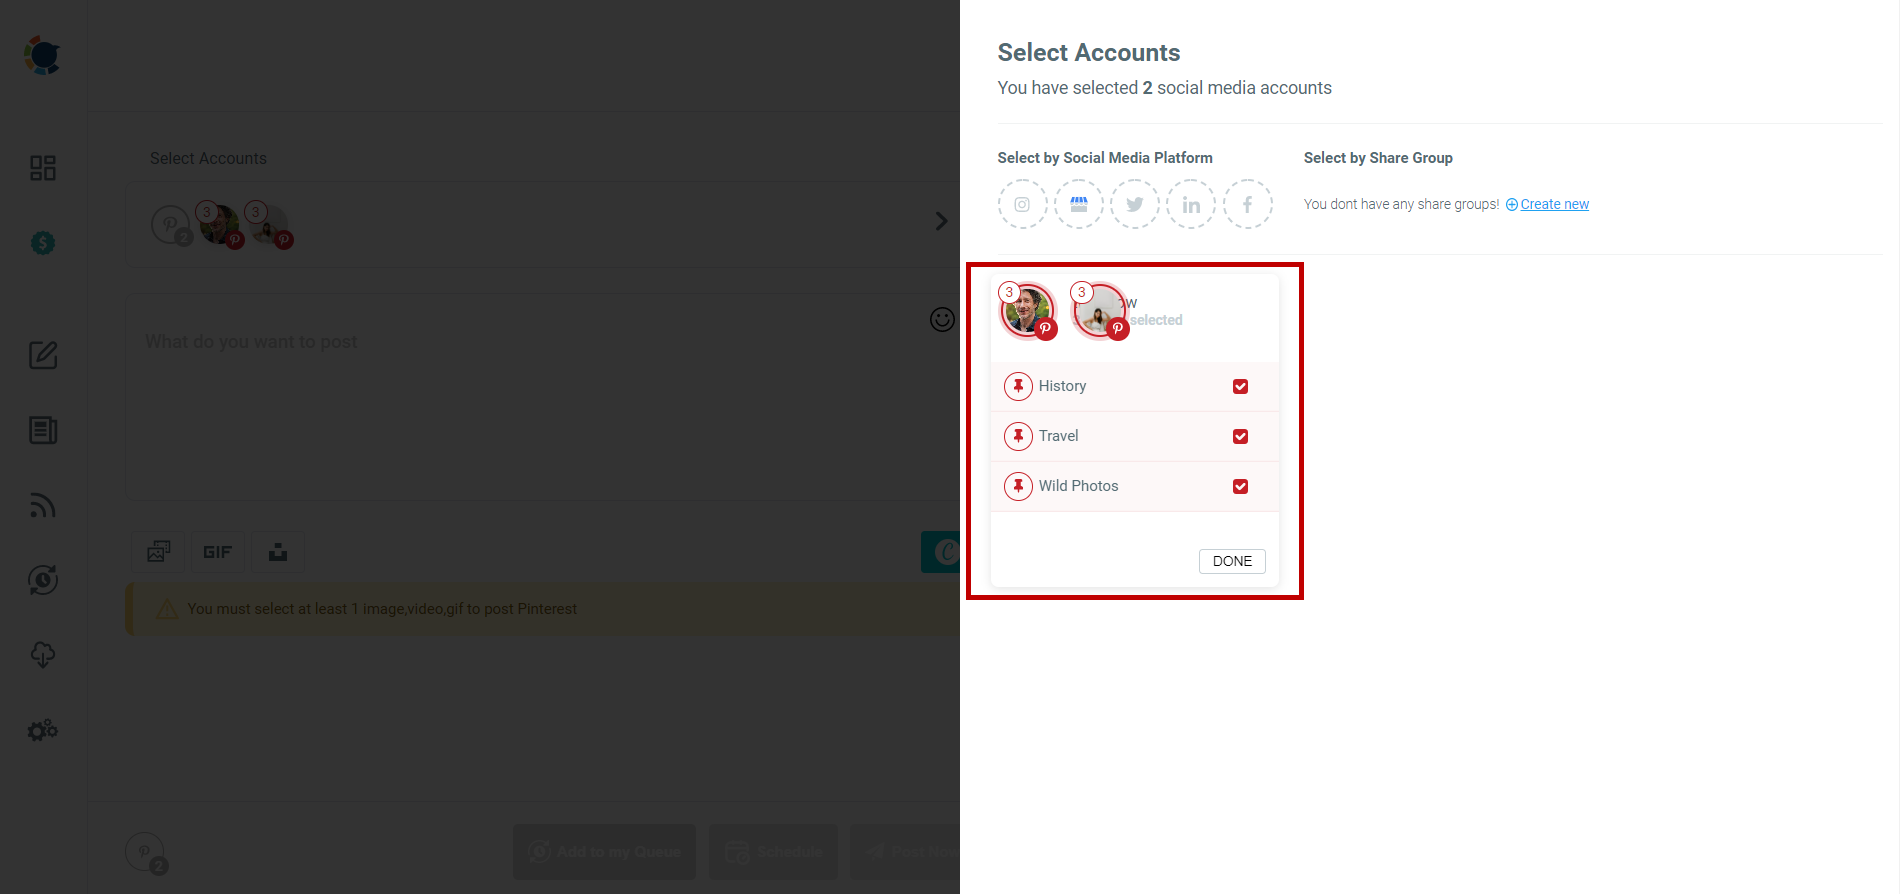
Step #3: Proceed with selecting your Pinterest account(s).
Then comes the step of defining boards to save your pin on Pinterest.
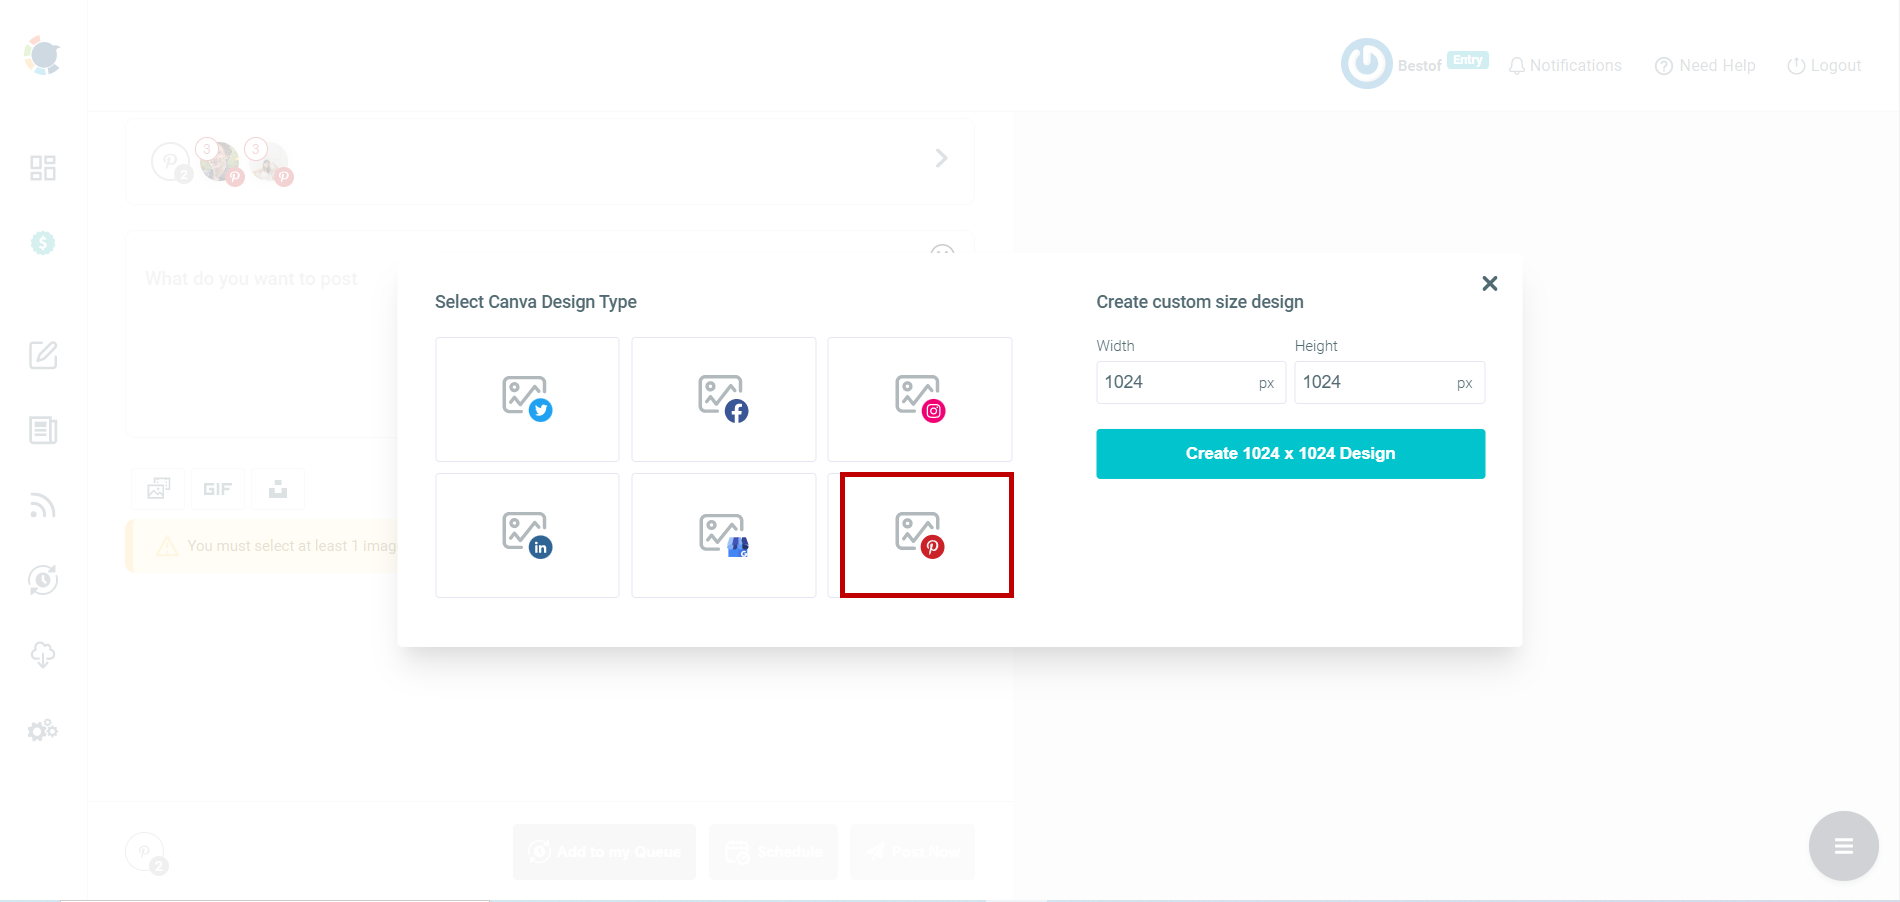
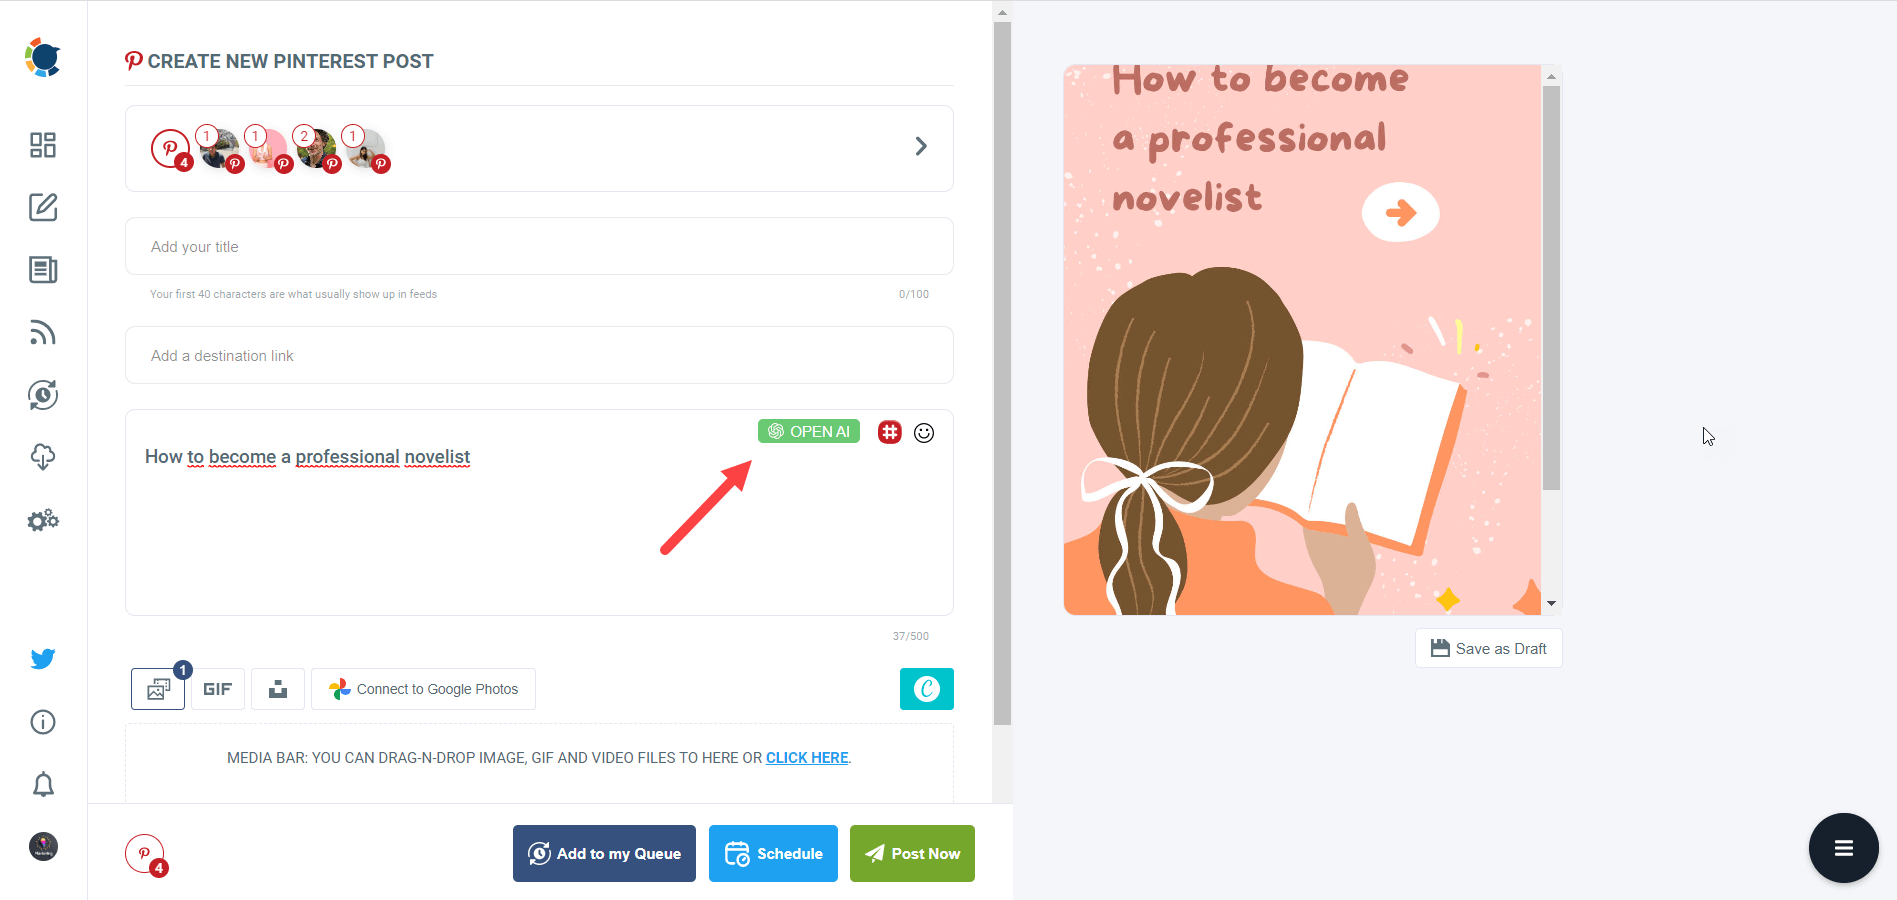
Step #4: Now, you can start designing your pins through Circleboom's built-in Canva. Its ready-made post templates save you time and effort. Also, you won't need to worry about the ideal pin sizes.
You can also connect your Google Photos to Circleboom and post images and videos directly from the cloud.
Step #5: Now it's time for texts. Thanks to its ChatGPT integration, Circleboom lets you create or improve your pin descriptions enriched by AI-generated hashtags, emojis, and other extras like grammar checks or translations.
This will help you add relevant keywords to your Pinterest posts to increase the visibility and SEO value of your pins. This will help you add relevant keywords to your Pinterest posts to increase the visibility and SEO value of your pins.
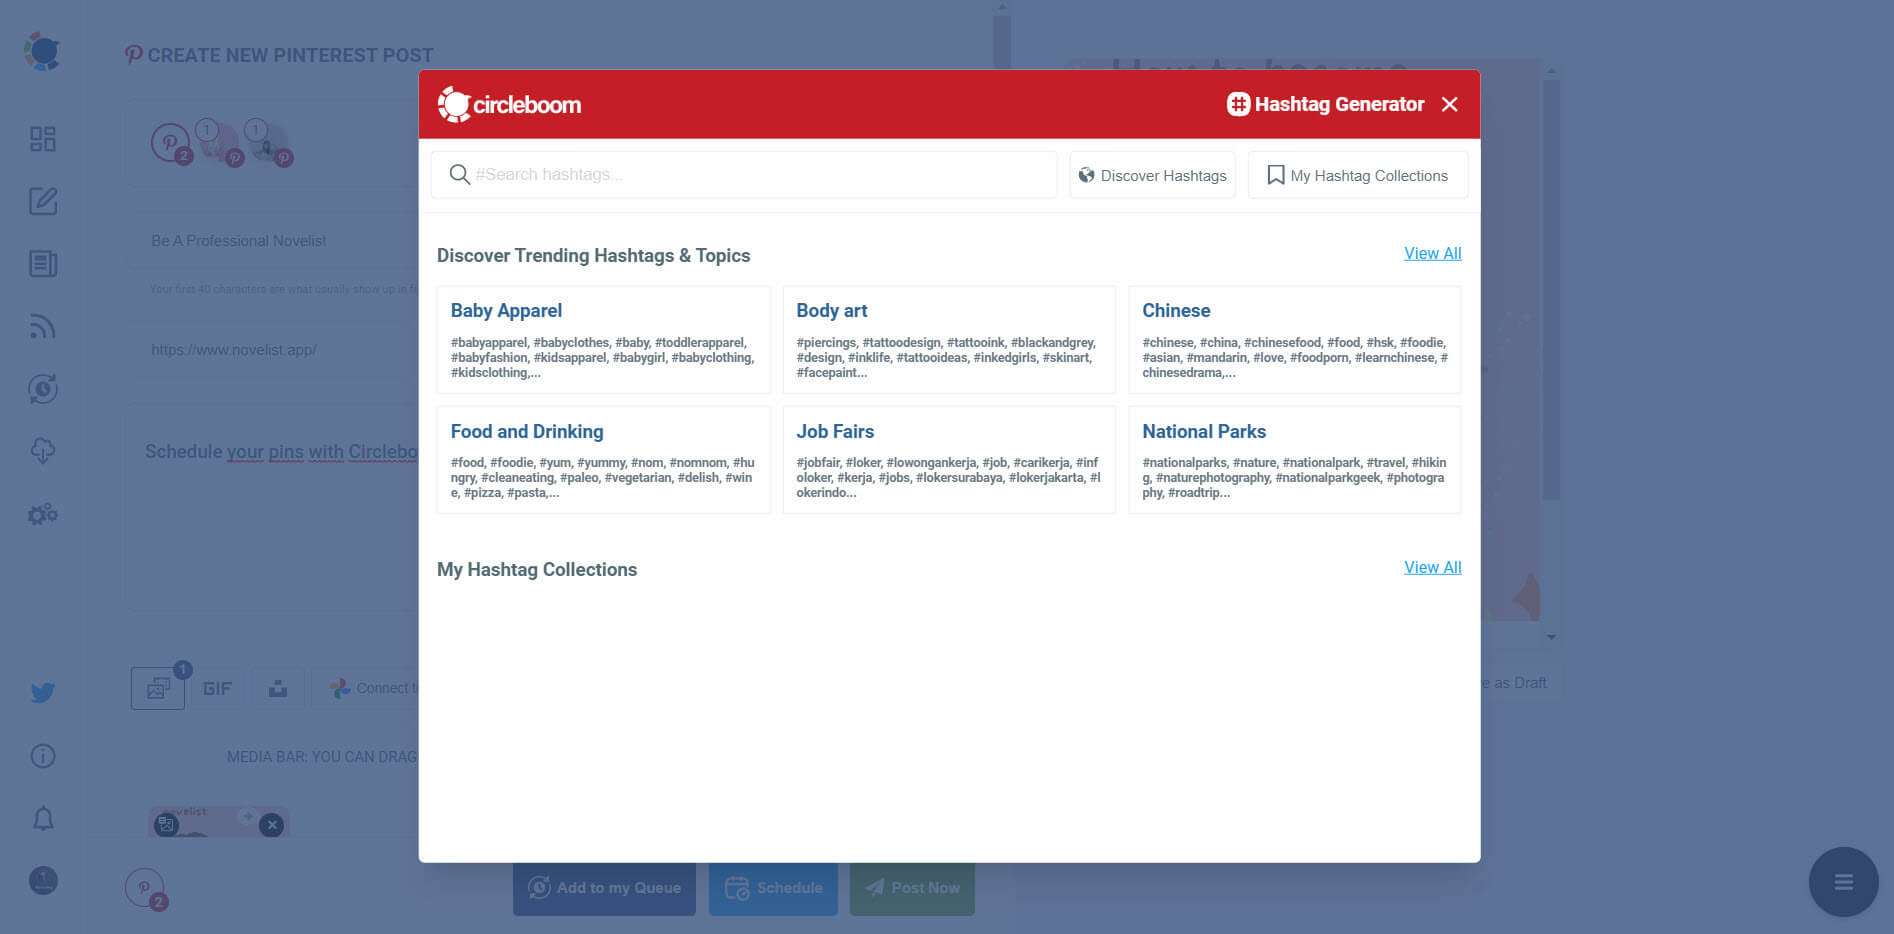
Step #6: The icing on the cake: Pinterest hashtag generator. You can find, create, and save relevant and popular hashtag groups for your auto-generated Pinterest content.
This will also help you find trending hashtags and grow your Pinterest account faster.
Step #7: Once you generate your Pinterest pins, you can share them immediately, or you can schedule them for the future.
Also, you can set time intervals and queue your pins to automate Pinterest posts.
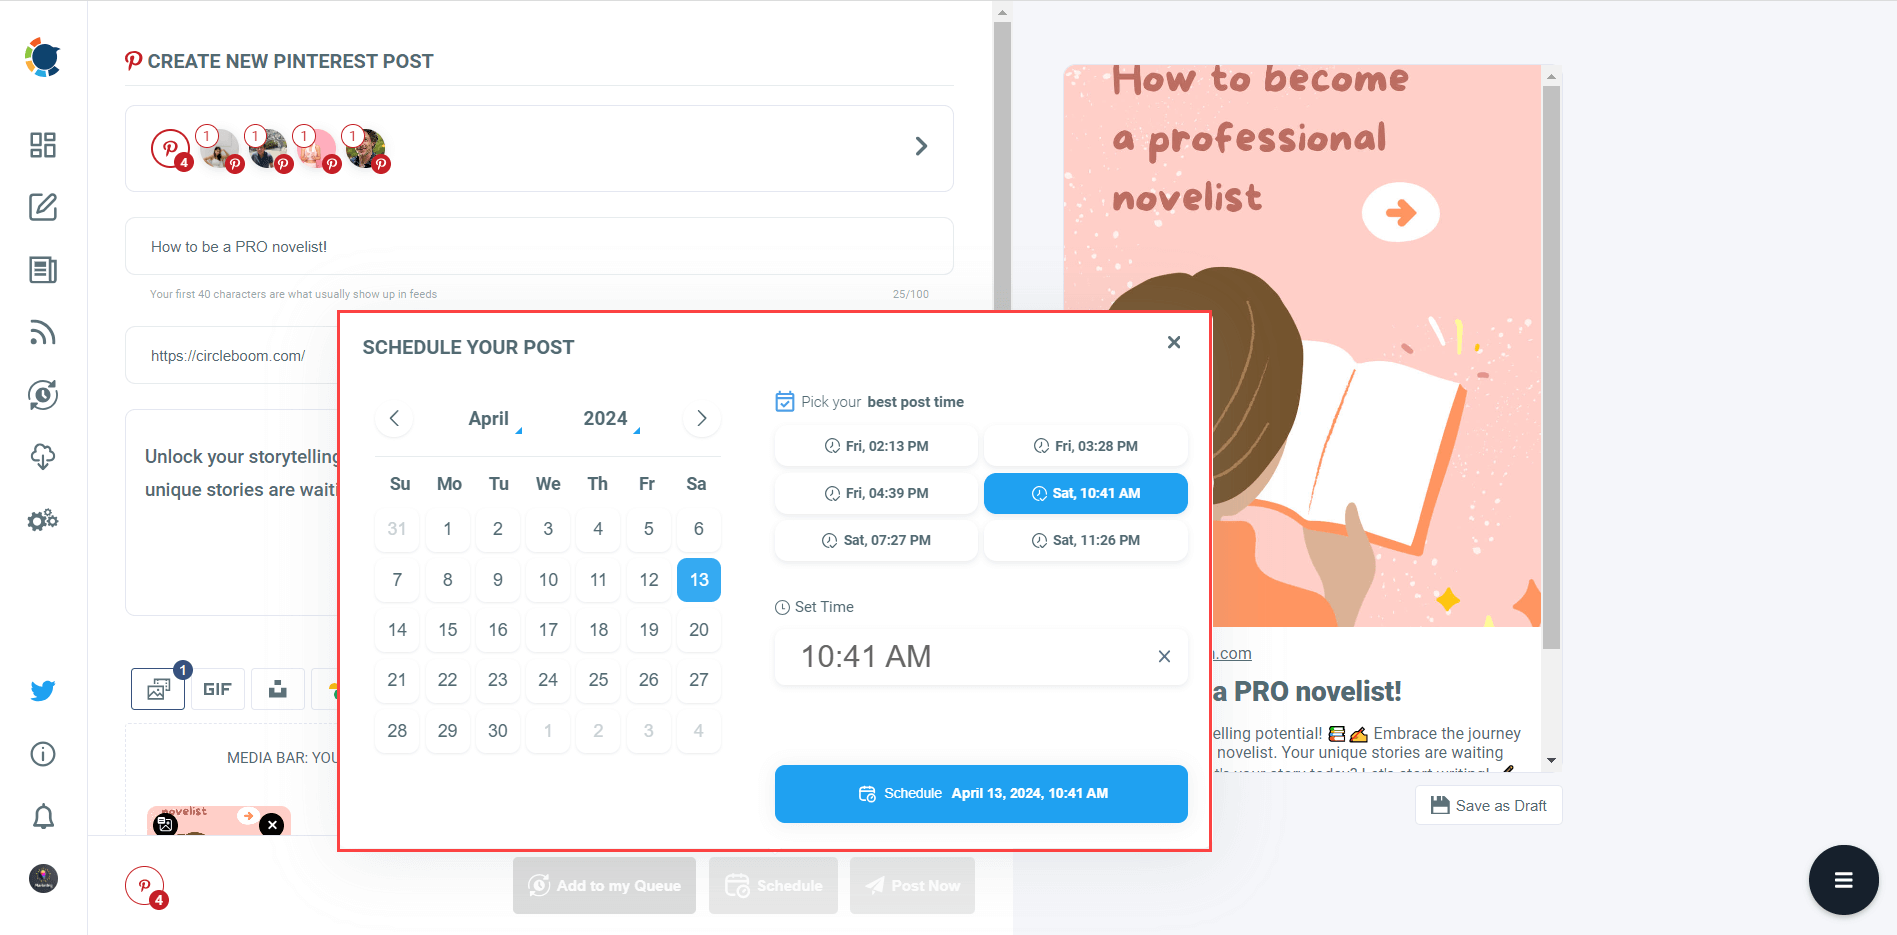
It takes just a few minutes, and your Pinterest stays active even when you’re not online. You can plan out days—or even weeks—of content in one go.
Since then, my pins go out consistently, my views have grown, and I’ve had more visits to my shop—all without the daily posting stress.
6. Joining the Pinterest Art Community
One thing I didn’t expect was how connected the Pinterest art space actually is.
Once I started engaging with others—not just posting my own work—I noticed an increase in visibility, saves, and even profile visits.
Here’s what worked for me, organized as a quick reference table:
| Community Tip | Why It Helps |
|---|---|
| Follow other artists in your niche | Builds a curated feed and helps you stay inspired. |
| Engage with their pins (save & comment) | Signals to Pinterest that you're active and interested in similar content. |
| Join group boards | Expands your reach by sharing your pins with an already-engaged audience. |
| Create your own group board | Positions you as a leader in your niche and encourages collaboration. |
| Collaborate with others on themed boards | Cross-promotion exposes your work to new followers from other creators' bases. |
| Repin high-quality content regularly | Keeps your boards fresh and helps you stay active without creating everything from scratch. |
By consistently engaging with other creators, I wasn’t just growing my own presence—I was also becoming part of a network that supports and inspires one another.
If you're only using Pinterest to post your own content and not connecting with others, you’re missing out on one of its most underrated growth tools.

7. Linking Pins to My Shop (and Making Sales)
At first, I didn’t include links—or I’d link to the homepage of my website.
But when I started linking each pin directly to a product page (like my Etsy listings), I saw a huge difference.
I also activated Rich Pins, which show the price and availability directly on the pin.
How to Set Up Rich Pins (Quickly):
- Add metadata to your website (Etsy and Shopify usually do this automatically).
- Validate your URL to Rich Pin Validator.
Now, when someone sees your pin, they also see:
- Product title
- Price
- Stock status
- Shop name
And they can click straight through to buy.
8. Tracking What Works with Pinterest Analytics
After a couple of months of pinning regularly, I started wondering—what’s actually working? Some pins were getting saved and shared, while others went completely unnoticed.
That’s when I discovered how valuable Pinterest Analytics really is.
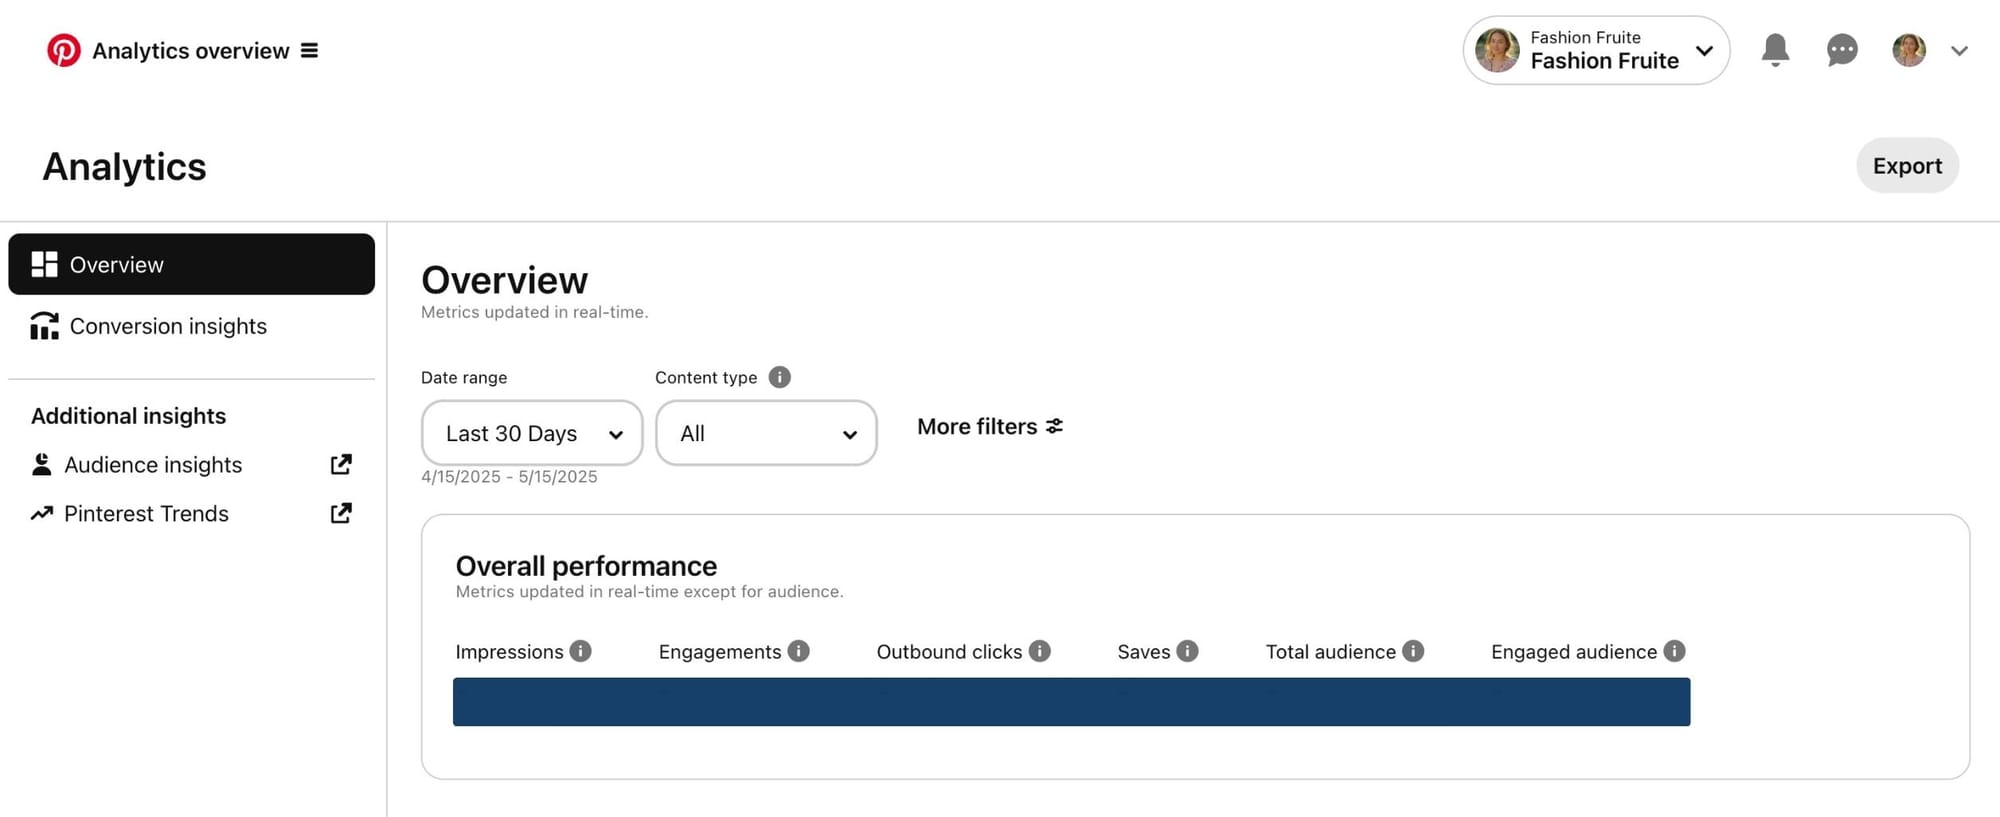
Pinterest gives you built-in analytics if you have a Business account, and it shows you everything you need to improve your strategy.
Here’s what I started checking regularly:
Top Performing Pins
This section showed me which pins were driving the most:
▶️ Impressions (how often they were seen),
▶️ Saves (which tells me what people find worth revisiting),
⚠️ and most importantly, Outbound Clicks—these are the people actually clicking through to my shop.
One surprising insight? Some of my older pins with minimalist black-and-white designs were outperforming my colorful ones. That helped me decide what to create more of.
Board Performance
Pinterest also shows which boards are getting the most activity. I noticed that one of my niche boards—“Neutral Abstract Prints”—was consistently pulling in traffic. I hadn’t even pinned to it in weeks.
That told me it was time to:
- Refresh that board with new content,
- Update its description with more targeted keywords,
- And even re-pin older but relevant pins into it.
Audience Insights
Another feature I didn’t expect to be so helpful: knowing who my audience is. Pinterest tells you:
- What your audience is interested in (home decor, wall art, boho living, etc.),
- What devices they’re using (mobile vs desktop),
- And what countries they’re coming from.
That helped me write more relevant captions and time my pins better. For instance, I learned that a large portion of my audience was in the U.S. and most active on mobile during evening hours.
What I Wish I Knew Earlier
If I could start over, here’s what I’d do differently:
*️⃣ Set up a business account right away.
*️⃣ Use keywords in everything.
*️⃣ Create pins with purpose—eye-catching titles and strong visuals.
*️⃣ Be consistent. Pinterest rewards steady effort.
*️⃣ Link every pin to a specific product or page.
*️⃣ Watch analytics and adjust.
Final Thoughts
Pinterest isn’t about quick wins or going viral. It’s about building a long-lasting visual catalog of your art that keeps working even when you’re offline.
Today, some of my pins from months ago are still bringing in views and clicks. That’s the power of Pinterest.
So if you’re an artist looking to promote and sell your work, I can say this with confidence: Pinterest is absolutely worth it—just give it structure, intention, and time.
